User:SerCenKing/Sandbox/2
|
|||
|---|---|---|---|
| Added by | Mehrunes' Razor | ||
| # of Zones | 12+ | ||
| Occupants | |||
| NPCs, Vampires | |||
| Console Location Code(s) | |||
| DL09Exterior01a, DL09Exterior02; DL9c01 (Sundercliff Watch); DL9c02 (Sundercliff Village); DL9c03 (Sundercliff Commune); DL9c04 (UNUSED CELL); DL9c05 (Sundercliff Mines); DL9c06 (Sundercluff Forge); DL9c07 (Excavated Ruin); DL9c08 (Varsa Baalim); DL9c09 (The Nefarivigum); DL9c10 (Forgotten Tunnels); DL9c08house1 (Cava Arpenia); DL9c08house2 (Cava Beldameld); DL9c08house3 (Cava Marspanga); | |||
| Region | |||
| Nibenay Basin | |||
| Location | |||
| Far east of Bravil, east of Lake Canulus and very near the border of Cyrodiil | |||

2 is a very large fort far east of Bravil containing NPCs and vampires (download-specific).

The location is added with the Mehrunes' Razor official download, and houses the eponymous artifact.
Sundercliff Watch is the largest dungeon in the game, containing a mixture of caves, buildings and Ayleid ruins. The location consists of 23 zones in total. The nine main zones are Sundercliff Watch, Sundercliff Village, Sundercliff Commune, Sundercliff Forge, Sundercliff Mines, Excavated Ruin, Varsa Baalim, Nefarivigum, and Forgotten Tunnels. Three smaller zones, Cava Arpenia, Cava Beldameld and Cava Marspanga link different areas of Varsa Baalim together, and in addition, there are multiple houses, side rooms and tents.
Sundercliff Watch served as a waystation in the time of the Reman Dynasty but has long been forgotten.
People[edit]
|
Related Quests[edit]
Notes[edit]
- In the Excavated Ruin, you can see a vampire and a Drothmeri member through a window you cannot go through. If you
tclthrough the window, you can find a hidden door to an area identified in the game as "UNUSED CELL" (editor IDdl9c04), which is just an Ayleid floor and door floating in a grey void. Entering the cell will show the message "You should not be here" until you leave it. The room's script is set to show the message to the player and all essential characters and to disable any non-essential characters. Unused cell: says “you shouldn’t be here”. Links to un accessible area of excavated. - This ruin contains 1 Cairn Bolete plant.
- Sundercliff Watch also appears in ESO as Fort Sundercliff, named for the surrounding town of Sundercliff.
Exterior[edit]


- The exterior is located at coordinates: Tamriel 46, -6; 47, -6; 48, -6; and 49, -6.
- This location's map marker (M on map) is named Sundercliff Watch (editor name DL09MapMarker). The entrance door is NNE? of the marker, 35 feet away.
- Second door is 104 feet from the main entrance to the SW?
- 1 Wilderness Creature (Mountains variety) is near the entrance.
- 1 Wilderness Creature (Valley variety) is near the entrance.
- The following plants can be found near the entrance: 3 Columbine plants, 27 Foxglove plants, 18 Green Stain Cup plants, 9 Monkshood plants, 1 Motherwort plant, 1 Nirnroot plant and 25 Summer Bolete plants.
Zone 1: Sundercliff Watch[edit]

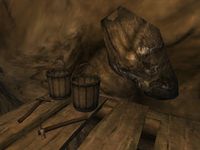
Upon entering the ruin, you will notice it is a mix of cave and fort architecture, with what looks like a bandit campsite in the first room. Here you will find one Drothmeri Soldier or Recruit, while another soldier patrols nearby. In the southeastern corner you will find a minor loot chest and a table with an iron arrow and an iron shield. Head past a collapsed statue of Stendarr and down the tunnel to the east until you reach an Old Wooden Door. If you try to open it, you are told that "A voice beyond the door calls out: Who gathers stormclouds over Nirn?". At first, your only option in response is to say nothing. However, if you check the Abandoned Knapsack (K) just to the right of the door, you will find a small diary with the required password: "Chimer". Note that unless you are sneaking, you will likely be detected by the enemies on the other side of the door.
Once you open it, you will be immediately faced with the Drothmeri Steward next to a desk hosting two sacks of gold, a flawed diamond, a flawed emerald, a flawless sapphire, 4 gold coins and the Steward's Registry (E). Fighting the Steward is also likely to draw in one or both of the two nearby soldiers or recruits. Make your way down a number of stairs, loot the chest and healing potion sack along the way and dispatch the patrolling soldier you'll likely come across.
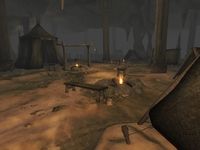
The final room of this zone resembles a large fort tower, open in the middle. You arrive on the top floor and this provides you with good sniping opportunities: there is a veteran on the level below you, a soldier or recruit on your level as well as another recruit who will always be sleeping on the bedroll (b) across from where you enter. Dispatch them and head down the lowest level, where you will find a blazing bonfire and two tents with bedrolls (b). Use door D to access the Sundercliff Village.
Occupants:
- 4 Drothmeri (Drothmeri Soldier or Recruit; level-dependent)
- 1 Drothmeri Veteran
- 1 Drothmeri Steward
- 2 Drothmeri Soldiers (patrolling)
- 1 Drothmeri Recruit (always sleeping)
Treasure:
- 2 Chest 02
- 1 Sack (Healing)
- 2 Sacks (Gold)
- 1 Abandoned Knapsack (at K; containing the Small Diary)
- The following note will always be found: Steward's Registry
- The following items will always be found: 1 Flawed Diamond, 1 Flawed Emerald, 1 Flawless Sapphire, 1 Iron Arrow, 1 Iron Shield and 4 gold coins
- Some of the above items are clustered at the following locations:
- At E: 1 Flawed Diamond, 1 Flawed Emerald, 1 Flawless Sapphire, 4 gold coins and the Steward's Registry
Doors and Gates:
- There are two doors in/out of this zone
- 1 door (at Out) leads outside
- 1 door (at C) leads to the zone Sundercliff Village
- 1 Old Wooden Door at D (requires password)
Other:
- 4 beds at locations b on map
- 4 bedrolls at locations b on map
Zone 2: Sundercliff Village[edit]


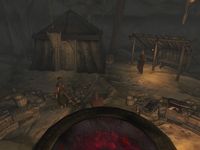
This zone is mostly taken up by a single very large cave on two levels with a plank bridge spanning across the middle. In the middle you will find a small village of five wooden buildings, most of which extend over multiple stories. After entering from door C and passing by an iron ore nugget you will arrive on the village's upper level. This can be useful for sniping, as without sneak its likely you will end up fighting multiple enemies at once. As well up to two enemies near you when entering, there are another 1-2 in the lower level, 1-2 guarding the second story doors of the two eastern buildings and 1 on the western side of the upper level. In addition, one torch-bearing soldier will be patrolling the entire village, a Veteran can be found practicing his swordsmanship on the target in the southwestern corner and up to three recruits can be found practicing their skills during the day.
On the eastern side of the top level when you enter you will find 1-2 soldiers or recruits huddled around a bonfire and guarding a nearby hutch. In the northwestern corner is the Jail (E) and a minor loot chest can be found just behind it. The door at D leads to the Sundercliff Forge. While it provides the quickest access to that zone, for a full exploration you will want to ignore it for now.
If you want to cross to the western side you can use the main plank bridge, though this will certainly cause you to be detected by the enemies below, or sneak along the northern or southern walls. To access the lower level you can either jump down, use the wooden stairs from the western side or enter either of the two buildings on the eastern side from the second floor door and then exit via the first floor door.
The southern building on the near (eastern) side of the cave is the Canteen and you can access its second floor door (G) by using the path along the southern wall. There may be an enemy posted as guard here, though if you're lucky they'll be sleeping on the nearby bedroll (b). From here you can also use the small plank bridge to access the Private Attic via the door at H (leveled lock). The first floor door of this building is boarded up, but you will find a hutch nearby. Meanwhile the building just to the west of the jail is the Recruit Barracks. You can either enter via the second floor door (F), although this will be guarded by an enemy, or use the trapdoor on the roof. The final building are the Soldier Lodgings, which you can enter from the lower level via door I.
On the western side of the upper level you will find an enemy guarding the door (J) to the Sundercliff Commune and two hutches (one on the Lodgings' roof). On top of the training target in the southwestern corner you will find a Keen Edge Potion and a sack with healing potions.
Finally, if you take either of the tunnels heading east from the lower level you will reach a rectangular chamber used as a training area. In the southern section are two tents with bedrolls (b) while to the north are a few wooden platforms hosting a minor loot chest, a variety of iron weapons and a copy of Manual of Arms. A soldier will be patrolling nearby and usually at least one recruit can be found practicing here. The door at K takes you to the Sundercliff Commune.
Occupants:
- 4-7 Drothmeri (Drothmeri Soldier or Recruit; level-dependent)
- 2 Drothmeri Soldiers (patrolling)
- 1 Drothmeri Veteran (always training)
Treasure:
- 2 Chest 04 (Healing)
- 1 Sack (Healing)
- 4 Hutches (contain a mixture of food, gold, heavy armor, weapons and potions)
- The following items will always be found: 1 Iron Ore, 2 Keen Edge Potions and 1 copy of Manual of Arms
- The following weapons will always be found: 2 Iron Daggers, 2 Iron Longswords and 2 Iron Warhammers
Doors and Gates:
- There are four doors in/out of this zone
- 1 door (at C) leads to the zone Sundercliff Watch
- 2 doors (at X and Y) lead to the zone Sundercliff Commune
- 1 door (at C) leads to the zone Sundercliff Forge
- There are five doors leading to sub-sections of this zone:
- 1 door (at X) leads to the Jail
- 1 door (at X) leads to the Canteen
- 1 door (at X) leads to the Private Attic
- 1 door (at X) leads to the Recruit Barracks
- 1 door (at X) leads to the Soldier Lodgings
Other:
- 1 bed at locations b on map
- 5 bedrolls at locations b on map
Jail[edit]
This building is quite small and has no enemies. To the left when entering is a locked cell door (leveled; minimum Average). Behind it is a bedroll and a Morag Tong Assassin, who you cannot speak to but can free by unlocking the door. Doing so will cause him to seek out and attempt to kill the Drothmeri Commander, so this can be useful. The main room hosts a bedroll and a table with two wrist irons and a letter explaining the situation with the prisoner.
Occupants:
Treasure:
- The following note will always be found: 1 Jailor's Letter
Other:
- 2 bedrolls
Canteen[edit]
When entering from the second floor door you may immediately find yourself fighting a soldier or recruit, so be prepared. Loot the chest nearby and head downstairs, where you will find another soldier or recruit guarding another chest. Beyond the chests there is no loot, beyond a surfeit of foodstuffs.
Occupants:
- 1-2 Drothmeri (Drothmeri Soldier or Recruit; level-dependent)
Treasure:
Private Attic[edit]
This building consists of a single room with a laborer and possibly a Drothmeri soldier or recruit guarding a bed and a minor loot chest. Just above the bed, perched on one of the rafters, is a plate with two flawless diamonds, a topaz, a flawed emerald, a flawed sapphire and a flawed ruby. You can reach it by jumping from on top of the bed.
Occupants:
- 0-1 Drothmeri (Drothmeri Soldier or Recruit; level-dependent)
- 1 Laborer
Treasure:
- 1 Chest 01
- The following gems will always be found: 1 Flawed Emerald, 1 Flawed Sapphire, 1 Flawed Ruby, 2 Flawless Diamonds, 1 Topaz
Other:
- 1 bed
Recruit Barracks[edit]
This building is divided on two floors and will host up to three Drothmeri Recruits: depending on the time of the day they may instead be found training outside. On the top floor you will find two minor loot chests and three beds, while on the bottom floor are two sacks with healing potions, a repair hammer and a bottle of Cyrodilic brandy.
Occupants:
- 0-1 Drothmeri (Drothmeri Soldier or Recruit; level-dependent)
- 1 Laborer
Treasure:
- 1 Chest 02
- 1 Chest 04 (Healing)
- 2 Sacks (Healing)
- The following items will always be found: 1 Cyrodilic Brandy, 1 Repair Hammer
Other:
- 3 beds
Soldier Lodgings[edit]
This building can only be accessed via the door on the first floor, on the lower level of the village. On the bottom floor you may find a Drothmeri soldier or recruit as well as a minor loot chest and a table with 8 gold coins, a flawed ruby and a Topaz. On the upper floor are up to two more soldiers or recruits guarding another minor loot chest, a healing potions sack, a locked jewelry box, two beds, a bedroll and a dining table laden with food.
Occupants:
- 1-3 Drothmeri (Drothmeri Soldier or Recruit; level-dependent)
Treasure:
- 1 Chest 02
- 1 Chest 03
- 1 Sack (Healing)
- 1 Jewelry Box (leveled lock)
- The following items will always be found: 1 Flawed Ruby, 1 Topaz, 8 gold coins, 1 Biography of Barenziah, v 3
Other:
- 2 beds
- 1 bedroll
Zone 3: Sundercliff Commune[edit]


Commune: top door leads to upper level: after short tunnel mlc and big room divided by chasm (rope bridge) and with stair/ramps leading down. One recruit trains near house this side. One patrol back forth bridge and one stairs (both soldiers). This side also hatch and mlc. House this side: Yeoman; other side: Frathen (behind it potion sack) and
Yeoman: close quarters with recruit, dining table, double bed, locked mlc, lots iron arrows, mantle piece with iron bow, silver short, flawed topaz/saphire and 2 coins Frathen: bottom buried in rock with shovels and 1 iron vein, in bottom corridor bed, up: 3 gold sacks, table with 3 iron nuggets, 1 gold nugget, two transmutation scrolls and novice mortar. Another table with journal and 4 coins. Shelf: common soul, varieties Daedra, apprentice retort, Varla, other books, 2 tricobezoar extract, 2 lesser SG, receipt, treatise Ayleid city
Commander house also contains:
- A boss-level chest upstairs.
- A locked closet under the stairs with a handful of gems, including two flawless diamonds.
Commander: two heal sacks and mlc I front, labourer tending potato garden behind. Down fireplace and dining table. Up: training bag & chest, room with bed, table with books and map of kvatch(?), bedside table with jewel box and bezoar.
Veteran: one enemy outside, entrances up or down. Veteran plus soldier. Up: two beds and mlc, down: mlc, iron gauntlets, dining table
Commune down: chest and veteran’s lodge. Continue W: tunnel with crystals and allyleid architecture. Door with magic wall and braziers for bezoars guarded by soldier, bedroll also nearby
Occupants:
Treasure:
Doors and Gates:
Zone 4: Sundercliff Mines[edit]

After tunnel into big room with two levels (you down) with patrolling soldiers and labourers on wooden scaffolding mining ore. First attack: 2 soldiers and 3 labourers. Bottom level has 16 ores and 7 veins. Up SE tunnel: labourer, labourer and soldier. Along way: 6 ores and 6 veins, mlc and bedroll in tent. Three dead soldiers also (fought each other?) and one patrolling. Top: stone bridges connect areas. W area only access jump so can use snipe. SE: mlc. Central: empty. NE: campsite with soldier and labourer, 5 tents & bedrolls, campfire, tables and benches and mlc. Collapse and door forge
Occupants:
Treasure:
Doors and Gates:
-
An iron vein in the mine

Zone 5: Sundercliff Forge[edit]

Cave tunnels held up by beams and lighted with lamps. Along floor are holes covered by buckets from which see down (but cannot snipe). Immediately: patrolling soldier (another soldier and labourer attacked). Either way same but S tunnel gives access to empty room. E: door Mines
From mines: room with 2 labourer and weapons apprentice plus forge, repair hammer, 4 ir short, tent with bedroll, table with note. Armour apprentice in next room and likely alerted, also forge, labourer, tent with bedroll, 10 iron boots and table with note home. Next room: forgemaster, forge, table with hammer and 3 iron daggers, also 4 iron claymores, iron greaves & boots. Tent: bed, chest, bookshelf and table with 3 coins, flawed diamond/ruby, flawless topaz and bezoar. Tunnel N: pull rope opens rock wall and back at entry
Occupants:
Treasure:
Doors and Gates:
-
Sundercliff Forge
-
Sundercliff Forge


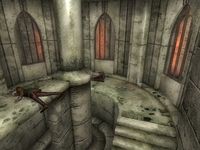
Zone 6: Excavated Ruin[edit]

Excavated ruin: Ayleid. First room: overturned tables, blood pools and big collection bones and skulls in middle, skele trapped under rockfall in S tunnel. Balcony overlook huge room (no access) with pickaze, diamond and ruby. S tunnel has cave in and skeleton so go W. Blood marks throughout. Door to Baalim
Occupants:
Treasure:
Doors and Gates:
Zone 7: Varsa Baalim[edit]


Baalim: huge Ayleid/cave mix. Enter upper level with bloody stone ramp lead down. Snipe on two soldiers below standing over dead veteran, also 3 vampires attack (fight each other?). Jump along S side to get to mlc behind Ayleid circular wall. Below are two doors to Arpenia. With good acro can jump past N wall shortcut to Marspranga door and other areas. Or just continue W through collapsed ruins (veteran dead), past two vampires and two soldiers to door to Beldameld.
From Belda: to SE: two soldiers fighting two vampires, candle lit altar with skulls, 2 bedroll, campfire, loads bones and 2 mlc. NW along wall: dead veteran. Jump down E: circular ruin with vampire. To S: stone ramp over wall leading to prev door. to N: dead veteran, two vampires (may also be spotted by one above: patriarch) and door Marsprung. Continue S for more mlc: two tucked in far SE corner, one in SW near entrance to room. Cannot reach above without good acro.
From Mar: to W along wall: room with campfire, bedroll, bones, two mlc, vampire and sniping spot (stool, bow & arrows) to E: soldiers fighting vampires. Climb up to ruins: mlc, patriarch and door Nef. Continue E down bloodied causeway: dead recruit with undelivered letter. Can the jump down towards entrance
Occupants:
Treasure:
Doors and Gates:
Zone 8: Cava Arpenia[edit]

Arpenia: bloodied door leads to bloodied tunnels. Room with 2 vampire, 2 mlc, 2 bedroll, pile of bones/skele with dead veteran
Occupants:
Treasure:
Doors and Gates:
Zone 9: Cava Beldameld[edit]

Beldameld: everything tilted sideways (Ayleid ruins). Collapsed room with vampire, rubble and loads bones. Door Baalim
Occupants:
Treasure:
Doors and Gates:
Zone 10: Cava Marspanga[edit]

Marspranga: dead & bloodied veteran. 3 Soldier fighting 3 vampires. 2 bedroll, 2 mlc and usual bones/skeleton. Door back
Occupants:
Treasure:
Doors and Gates:
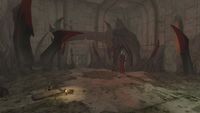
Zone 11: The Nefarivigum[edit]

creepy red lighting. Potion sack and 3 dead (2 veteran, vampire), then two dead vampire and one soldier. Room with oblivion stuff and Frathen taking to weird creature. Also bedroll, potion sack and field journal. Can pickpocket heart but no effect. Mithrae disappears (weapons crumble into dust). Killing then opens gate and once take razor hidden wall reveals door to forgotten tunnel.
Occupants:
Treasure:
Doors and Gates:
-
The Nefarivigum
-
The Nefarivigum


Zone 12: Forgotten Tunnels[edit]


Avoid W tunnel as collapse, two rats and underwater swim to door Out in Lake Canulus
Occupants:
Treasure:
Doors and Gates: