Oblivion:Bruma Oblivion World
| Oblivion World: Bruma Oblivion World (lore page) |
|
|---|---|
| # of Peripheral Towers | 0 |
| # of Non-Random Caves | 0 |
| Important Treasure | |
|
|
| Console Location Code | |
| Worldspace: MQ10BrumaOblivionGate MQ10BrumaCitadel MQ10BrumaHall01 MQ10BrumaHall02 MQ10BrumaCitadelLord |
|
| Fixed Gate | |
| Gate outside Bruma (map) (during Bruma Gate) | |
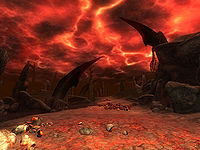
Bruma Oblivion World is a small Oblivion World only encountered at Bruma (quest-specific).
The Oblivion Gate in front of Bruma during the quest Bruma Gate always connects to this world. You will need to lead guard captain Burd and two of his men through the world and into the main tower to close the gate and remove the threat to the city.
Contents
Related Quests[edit]
- Bruma Gate: Help the Bruma guard close an Oblivion Gate just outside the city.
Exterior[edit]
This world is fairly linear and has no peripheral towers or cave systems to explore. Two smaller islands can be found a short distance away from the main island: one to the southwest and another to the south. Upon entering from the Oblivion Gate at OG, you can jump over the rocks to the south and make your way across the lava to reach the latter island. It hosts an enemy and a Fleshy Pod.
From the gate, head east, battling past four Daedra and negotiating three Claw Traps (s) until you reach a ruined stone bridge. Follow the path as it turns counterclockwise and brings you close to a narrow stone archway in the shadow of the main tower. Along the way you will find six enemies, another Claw Trap (s) and two Fire Turrets (f).
Just beyond the archway are two more enemies and an intersection. First head north down the path to an area enclosed by stone walls. Here you will find a boss-level Daedra guarding two Fleshy Pods, a Blood Fountain (b) and two Magicka Essences (m).
Return to the stone archway and now head west. After fighting past a Dremora, you will arrive at another stone arch guarded by two Fire Turrets (f) and a Dremora Mage; high on a rock to the west is another enemy. Beyond the arch is the entrance (B) to this world's Sigil Keep: The Fury Spike. Nearby is a boss-level Dremora (A), a Magicka Essence (m), a Gas Trap (g), another Fire Turret (f) and two Claw Traps (s). From here you can also jump up the hill to the west and then across some lava to access the second small island to the west; it hosts a single enemy.
Occupants:
- 1 boss-level Daedra (always best possible level) at A
- 1 boss-level Dremora (always best possible level) at A
- 13 Daedra (always best possible level)
- 2 Daedric occupants (Daedra or Dremora; always best possible level)
- 1 Dremora (always best possible level)
- 1 Dremora Mage (always best possible level)
Treasure:
Plants:
- Plants are marked by yellow dots on map
- 96 Blood Grass plants
- 46 Harrada plants
- 35 Spiddal Stick plants
- 11 Blood Grass plants, 4 Harrada plants, and 6 Spiddal Stick plants are in inaccessible locations
Traps:
- 6 Claw Traps at locations s on map
- 6 Fire Turret traps at f
- 1 Gas Trap at g
Doors and Gates:
- There are two doors in/out of this zone
- 1 Oblivion Gate (at OG) leads to Tamriel
- 1 door (at B) leads to the zone The Fury Spike (Z1)
Other:
- 1 Blood Fountain at location b on map
- 3 Magicka Essences at m
The Fury Spike[edit]
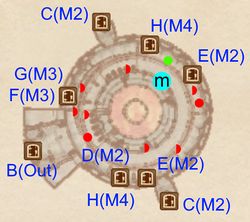
When entering from door B you will be on the lowest level of the tower, which is guarded by two Dremora and up to two more Daedric enemies. From here, use either of the doors at C to enter the Rending Halls.
When returning from the Rending Halls via the door at D, you will be on the second level of the tower. Head up to a dead-end area with one The Punished container and a Magicka Essence (m). When instead returning from the Rending Halls via either of the doors at E you will now be on the third level. After battling past up to two enemies, use the door at F to access the Corridors of Dark Salvation.
Returning from the Corridors from door G you will find yourself on the fourth and final level of the tower. Here a Sigil Keeper and up to one more enemy will guard the two doors (H) to the Sigillum Sanguis. Both have an Average lock but are opened by the key carried by the Keeper.
Occupants:
- 1 Sigil Keeper
- 2 Dremora
- 0-3 Daedric occupant (Daedra or Dremora; 75% chance)
- 0-4 Daedric occupant (Daedra or Dremora; 50% chance)
Treasure:
Doors and Gates:
- There are ten doors in/out of this zone
- 1 door (at B) leads outside
- 2 doors (at C, first level) lead to the zone Rending Halls (M2)
- 1 door (at D, second level) leads to the zone Rending Halls (M2)
- 2 doors (at E, third level) lead to the zone Rending Halls (M2)
- 1 door (at F, third level) leads to the zone Corridors of Dark Salvation (M3)
- 1 door (at G, fourth level) leads to the zone Corridors of Dark Salvation (M3)
- 2 doors (at H, fourth level) lead to the zone Sigillum Sanguis (M4)
- Note that two sets of doors (D and the southern door at H; and F and G) are located directly above each other and thus appear as a single door on the map.
Other:
- 1 Magicka Essence at location m on map
Rending Halls[edit]
After entering from either of the doors at C from the lowest level of The Fury Spike, head up the corridor until you reach a room with a Dremora, up to two more Daedric enemies and a Blood Fountain (b). There are also five Citadel Spike traps at S, including two in the northeastern corner guarding one The Punished container.
Door D on the western wall gives you access to the second level of The Fury Spike. Once you return, open the eastern door (F) instead and head up the corridor. The next corridor hosts a Daedra and a Citadel Trident Blade trap (T) which is operated by the Claw Lever at L. In the final room are two The Punished containers and two doors E which lead to the third level of The Fury Spike.
Occupants:
Treasure:
Traps:
- 5 Citadel Spike traps at locations S on map
- 1 Citadel Trident Blade trap at T
- 1 Claw Lever trigger (activates Trident Blade trap) at L
Doors and Gates:
- There are five doors in/out of this zone
- 2 doors (at C) lead to the zone The Fury Spike, first level (M1)
- 1 door (at D) leads to the zone The Fury Spike, second level (M1)
- 2 doors (at E) lead to the zone The Fury Spike, third level (M1)
- 1 door at F (initially closed)
Other:
- 1 Blood Fountain at location b on map
Corridors of Dark Salvation[edit]
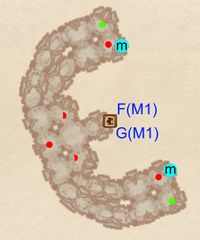
After entering from the third level of The Fury Spike via the door at F, you can pick either the northern or southern corridor, both of which lead upwards towards the main room of this zone. There you will find a Dremora and up to two more Daedric enemies. Along the way, in each corridor, you will find another Dremora guarding one The Punished container and a Magicka Essence (m). Use door G to access the fourth level of The Fury Spike.
Occupants:
Treasure:
Doors and Gates:
- There are two doors in/out of this zone
- 1 door (at F) lead to the zone The Fury Spike, third level (M1)
- 1 door (at G) lead to the zone The Fury Spike, fourth level (M1)
- Note that the two doors (F and G) are located directly above each other and thus appear as a single door on the map.
Other:
- 2 Magicka Essences at locations m on map
Sigillum Sanguis[edit]
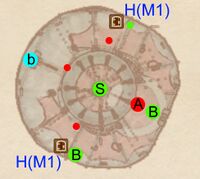
This is the final zone of this world, comprising a single large room over three levels. Upon entering from The Fury Spike via either of the doors at H, you will find yourself in a corridor with a Blood Fountain (b) before emerging in a large circular room hosting a Daedra. On the second level of the same room are two Dremora Archers guarding one boss-level (B) and one regular The Punished containers. The highest level hosts a boss-level Dremora, another boss-level The Punished container (B) and the world's Sigil Stone (S). As soon as you take the stone, you will be transported back to the area in front of the Bruma city gate.
Occupants:
- 1 boss-level Dremora (always best possible level) at A
- 2 Dremora Archers
- 1 Daedra
Treasure:
- 1 Sigil Stone (S)
- 2 boss-level The Punished at B
- 1 The Punished (Healing)
Doors and Gates:
- There are two doors in/out of this zone
- 2 doors (at H) lead to the zone The Fury Spike, fourth level (M1)
Other:
- 1 Blood Fountain at location b on map


